原文链接:Writing a Wayland Compositor, Part 3: Rendering a window
译者注:这个系列文章中使用的为早期 wlroots 版本,大约在 0.3 到 0.4.1 之间,请注意安装的版本
这是关于使用 wlroots 从头开始编写 Wayland 合成器的系列文章中的第三篇。如果你还没有看过第一篇文章的话,可以看看。我们从一个 Wayland 服务器开始,它接受客户端的连接,并暴露了一些全局的东西,但还没有做任何特别有趣的事情。我们今天的目标是做一些有趣的事情–渲染一个窗口!。
本文所剖析的提交是 342b7b6。
为了渲染窗口,我们要做的第一件事就是建立合成器。客户端使用 wl_compositor 全局来分配 wl_surfaces,并将 wl_buffers 附加到这些 surface。这些 surface 只是一个通用的机制,用于与合成器共享像素缓冲区,并不带有隐含的角色,如 "应用窗口"或 “面板”。
wlroots 提供了一个 wl_compositor 的实现。让我们为它预留一个引用:
1 | struct mcw_server { |
然后将其组装起来:
1 | wlr_primary_selection_device_manager_create(server.wl_display); |
如果我们现在运行 mcwayface,用 weston-info 查看全局变量,我们会看到一个 wl_compositor 和 wl_subcompositor 已经出现:
1 | interface: 'wl_compositor', version: 4, name: 8 |
你可以通过 wlroots 的 wl_compositor 获得一个 wl_subcompositor。我们将在以后的文章中讨论子合成器。说到我们将在另一篇文章中讨论的东西,也要加上这个:
1 | wlr_primary_selection_device_manager_create(server.wl_display); |
还记得我之前说过,surface 只是一些没有作用的像素团吗? xdg_shell 是一个可以让 surface 具有作用的东西。我们将在下一篇文章中更多地讨论这个问题。添加了这个之后,很多客户端就可以连接到你的合成器并生成一个窗口。然而,如果不添加其他东西,这些窗口永远不会在屏幕上显示。你必须要渲染它们!
wlroots 与 wlc 和 libweston 等库的不同之处在于,wlroots 不为你做任何渲染。这给了你很大的灵活性,你可以用任何你喜欢的方式渲染表面。客户端只是给了你一堆像素,你如何处理它们由你自己决定–也许你要做一个桌面合成器,也许你想把它们画在 Android 风格的应用切换器上,也许你的合成器在 VR 中排列窗口–所有这些都可以通过 wlroots 实现。
事情即将变得复杂,所以让我们从简单的部分开始:在 output_frame 处理程序中,我们必须获得我们想要渲染的每个 wlr_surface 的引用。所以让我们遍历我们的 wlr_compositor 所记录的每一个 surface:
1 | wlr_renderer_begin(renderer, wlr_output); |
wlr_compositor 结构有一个名为 surface 的成员,它是一个 wl_resource 的列表。我们提供了一个辅助方法来从其对应的 wl_resource 中产生一个 wlr_surface。调用 wlr_surface_has_buffer 只是为了确保客户端确实给了我们像素来显示在这个表面。
wlroots 可能会让你自己做渲染,但是我们提供了一些工具来帮助你编写具有简单渲染要求的合成器:wlr_renderer。我们已经稍微接触了一下,但现在我们要真正使用它了。这里需要有一点 OpenGL 的知识。如果你是一个完全不懂 OpenGL 的新手,我可以推荐这个教程来帮助你。由于你很匆忙,我们将对利用 wlr_renderer 所需的概念做一个快速的速成课程。如果你迷路了,就跳到下一个diff,把它当作使你的窗口出现的魔法咒语。
我们有一堆像素,我们想把它放在屏幕上。我们可以用着色器来做这个。如果你使用的是 wlr_renderer(mcwayface也会使用),着色器是为你提供的。为了使用我们的着色器,我们给它们提供一个纹理(一堆像素)和一个矩阵。如果我们把表面上的每个像素坐标当作一个矢量,从(0,0);左上角,到(1,1);右下角,我们的目标是产生一个矩阵,我们可以把矢量乘以这个矩阵来找到屏幕上要绘制的像素的最终坐标。我们必须将像素坐标从这个0-1系统投射到屏幕上我们想要的矩形的坐标。
然而,这里有一个问题:屏幕上的坐标也是从0到1,而不是,例如,0-1920和0-1080。为了把 "把我的640x480窗口放在坐标100,100处 "这样的坐标投射到屏幕坐标上,我们使用正投影矩阵。我知道这听起来很吓人,但不用担心-- wlroots 为你做了所有的工作。你的 wlr_output 已经有一个合适的矩阵,叫做 transform_matrix,它把你的屏幕的当前分辨率、比例系数和旋转都纳入其中。
好了,希望你还在听我说。这听起来有点复杂,但所有这些废话的表现是相当直接的。wlroots 提供了一些工具,使之对你来说很容易。首先,我们要准备一个 wlr_box,它代表(在输出坐标中)我们希望 surface 显示的地方。
1 | struct wl_resource *_surface; |
现在,最精彩的部分来了:我刚才说的那些花哨的数学运算都可以通过 wlroots 提供的一个辅助函数来完成:wlr_matrix_project_box。
1 | struct wl_resource *_surface; |
这需要一个 float[16] 的引用来存储输出矩阵,一个你想投影的盒子,一些其他的东西,现在并不重要,以及你想使用的投影–在这个例子中,我们只是使用 wlr_output 提供的投影。
我们之所以让你理解并执行这些步骤,是因为你完全有可能在将来想用不同的方式来做这些事情。这只是最简单的情况,但请记住,wlroots 是为各种情况设计的。现在我们已经得到了这个矩阵,我们终于可以渲染这个 surface 了。
1 | struct wl_resource *_surface; |
我们还抛出了一个 wlr_surface_send_frame_done,这让客户端知道我们已经完成了,所以他们可以发送另一帧。我们完成了! 现在运行 mcwayface,然后执行以下命令:
1 | $ WAYLAND_DISPLAY=wayland-1 weston-simple-shm & |
看看这美妙的图片:
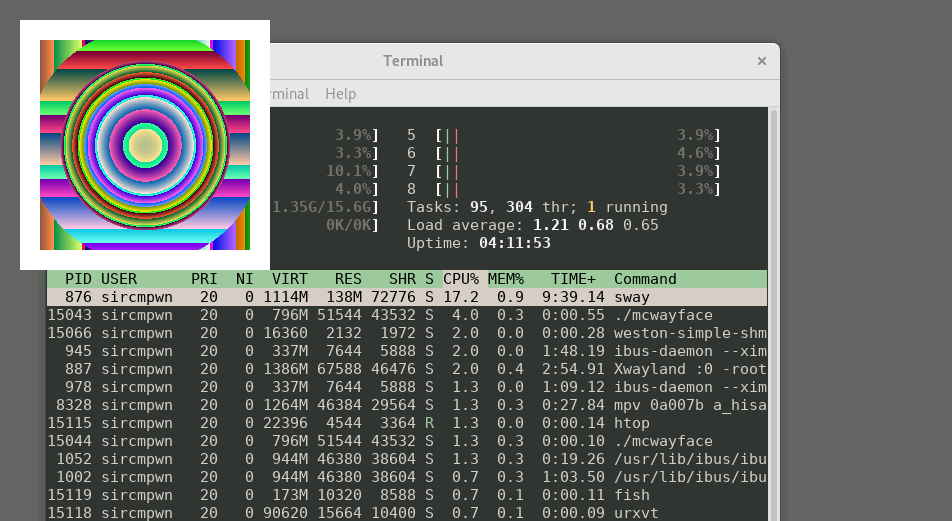
运行任何你喜欢的其他客户端–它们中的许多都可以工作。
我们今天使用了一点黑客技术,简单地渲染了 wl_compositor 所知道的所有表面。在实践中,我们需要扩展我们的 xdg_shell 支持(也可以添加一些其他的 shell)来正确地完成这个任务。我们将在下一篇文章中讨论这个问题。
在你走之前,请注意:在这次提交之后,我重新组织了一些东西–我们很快就会淘汰这种单文件的方法。请看这里的提交。
下回见!
本文及原文使用 CC-BY-SA 协议开放。